|
From time to time Simply Automated will release new and improved firmware for our products. The procedure below will help you update the firmware for your Controller Scheduler-Timer (Model UCS).
You need:
- PC with a serial port or USB to serial adapter
- DB9 serial cable (male on one end, female on the other)
- Controller Scheduler-Timer, Model UCS
- Internet connection
Step 1:
- Download the new UCS firmware by clicking here, UCS_v1.48.a90.
- Extract the zipped file and save to a know location (e.g. desktop) on your PC.
Step 2: Unplug AC power from the UCS.
Step 3: Plug the female end of the DB9 serial cable onto the RS-232 port on the bottom of the UCS. Connect the male end of the DB9 serial cable to the serial port on your computer, or to the DB9 end of the USB cable if you are using an adaptor.
Step 4:
- Download the SAI Downloader by clicking here, MegaLoadNet_Setup_V1.01 (or go to: http://www.microsyl.com/megaload/megaload.zip to download the latest version).
- Extract the zipped files and save to a known location (e.g. desktop) on your PC.
- Run the extracted executable (.exe) file.
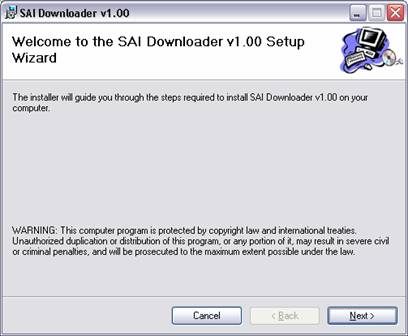
Click on "Next".
Accept the default location unless you have a preferred method of storing files on your computer. Click on Next>.
This screen will transition to:
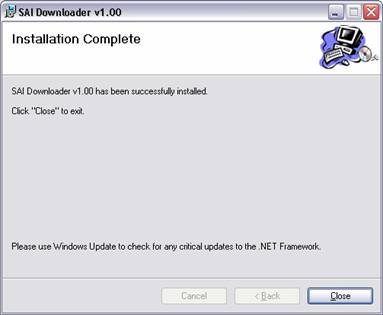
Click on "Close".
Step 5: Know your COM port.
The SAI Downloader program requires a COM port. You must know to which com port your serial cable is connected. If there is no COM port on your computer, a USB to DB9 adapter may be used. The following directions are for using a USB to DB9 adaptor.
Follow the installation directions that came with your USB adapter. Even though you are using your USB port on your computer, you must select a COM port in the SAI Downloader program. To do that you need to know the COM port that your USB to serial adapter captured.
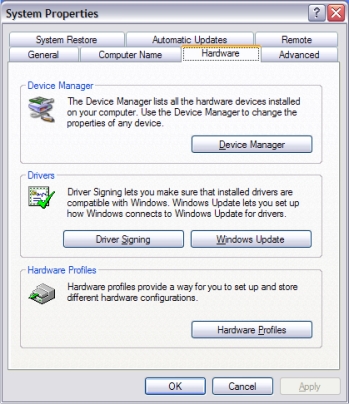
Go to Start → Control Panel → System → Hardware → Device Manager → Ports
Click on the “+” sign to drop down the ports connected to your computer.
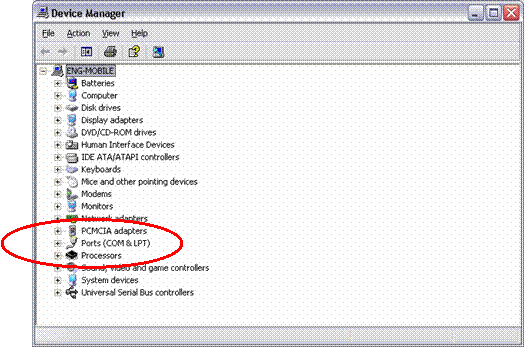
Your USB adapter should be listed here with the COM port it has been assigned by Windows.
Step 6: Open the Downloader program
Go to Start → All Programs  and look for Megaload.NET, it should be at the bottom of the list. A single click will open the program. and look for Megaload.NET, it should be at the bottom of the list. A single click will open the program.
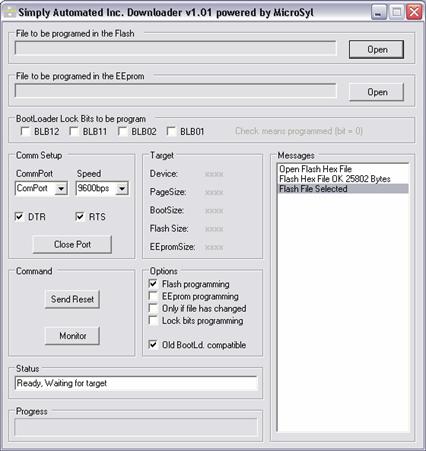
- Click on the drop down labeled ComPort (left side, almost halfway down). Select the desired COM port (found in Step 5 above).
- Speed should be 9600 bps, which is the default.
- DTR and RTS will need to be checked on most computers.
- Under the Options section, click Flash programming and Old BootLd. compatible.
- Click on Open button adjacent to “File to be programmed in the Flash” and select the program to be loaded.
 Step 7: Plug in the AC cord to power the UCS.
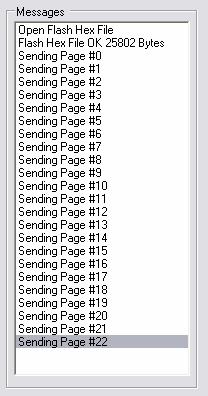
The Messages window of the MegaLoad program will indicate the sections of Flash being programmed. If you get a program failed message, recycle power on the UCS. Step 7: Plug in the AC cord to power the UCS.
The Messages window of the MegaLoad program will indicate the sections of Flash being programmed. If you get a program failed message, recycle power on the UCS.
If the Sending Page messages do not appear (as in figure to right) and the LED on the UCS begins to flash, interrupt the power to the UCS. You may need to uncheck and recheck the DTR box to get the bootloader program to run, or Click on Close Port, which toggles to Open Port, and then click on Open Port. Once this sequence is complete, reapply power to the UCS and the firmware should begin downloading.
If this version of Megaload.NET is not compatible with your computer, go to: http://www.microsyl.com/megaload/megaload.zip . Instructions are found at: http://www.microsyl.com/ under MegaLoad
Once the programming is complete, the UCS will begin its power cycle. The LED will flash and the logo screen will appear on the LCD display. The firmware version will be displayed, ensure the new firmware is indicated.
The UCS is ready for operation.
|

